
We may earn money or products from the companies mentioned in this post.
Time to Organize
Parents whose children have medical and educational challenges accumulate tons of paperwork. Although it might not be evident when a child is young, this paperwork could be critically helpful when applying for future services. Here are the steps parents can take to learn how to organize special education paperwork.
By the time a medically fragile or developmentally delayed child reaches the age of three, the paper trail is likely to be extensive. Most parents have file folders, shoe boxes, plastic boxes, and bags that fill up quickly. It is essential to save it all, set up a filing system, and stick to it. The older the child is, the more overwhelming the job becomes.
Even if your child(ren) are healthy and reaching developmental milestones, it is helpful to create an organized system you can pass on to them when they become adults.
Where I Learned This System
Approximately six years ago, I attended a Wrightslaw – Special Education Law and Advocacy Training. This class has been the most helpful that I have ever attended. Pete Wright is a special-education attorney.
During this training, I finally understood my children’s assessment scores and how a standard deviation on the Bell Curve applied. I received several books as part of the attendance fee. I refer to them frequently. One of the books was IDEA 2004 (special education law). We learned how to find the most critical information regarding the protections the law provides and flagged it for future reference.
Special education legal jargon makes sense now. Most importantly, I learned a filing system for the tons of paperwork I had accumulated for both of my children. This Wrightslaw training occurs all over the country. I highly recommend that every parent attend. This class helped me piece details together about my son’s educational history that I had forgotten.

When my son was in tenth grade, I was compelled to retain an attorney. My attorney received the proof she needed documenting our District’s wrongdoing. I had saved everything and could easily access the documents. Attorney fees were less because I made copies of the files she needed myself and they were easy to follow.
I began teaching what I learned about organizing paperwork for the FASD Network of Southern California where I was a board member for several years. Parents attending our support group were instructed on how to organize their paperwork. Other parent groups and professionals also made requests for my in-service. Once a parent learns what to do or a professional can assist their clients, maintaining and keeping up is a snap.
Step One – Purchase Office Supplies
First, you will need several supplies. If you don’t already have these items, they can be purchased at an office supply store, box store, or ordered online.

What you will need:
- A good three-hole punch, it will be used frequently
- Three-inch binders – a different color for each child
- Plastic file folder box for hanging folders
- Hanging file folders
- Post-it notes
- Clear plastic binder sleeves
- Pencils and highlighters
It is best to find space in your home where you can leave the workspace set up, such as a folding table in a low traffic area. If you have to pack and unpack your supplies each time you work, this may be an incentive to quit. Keep drinks and other liquids far from the area.
Step Two – Locate All of Your Documents
Locate all of the paperwork that you have about your child. Even if it is not medical or educationally related, everything can be filed in one place and organized. The additional documents can help to tell your child’s story. Move everything to your workspace. Each of your children will have different documents in their binders.
What to File:
- Medical, psychological and educational assessments
- School documents including IEP’s
- School assessments
- Work product
- Medical records
- Medical test results
- Growth charts
- Surgical reports
- Specialists notes
- OT, PT, Speech assessments and progress notes
- Independent educational evaluations
- SSI and other benefits or services documents
- Copies of correspondence sent to school
- Copies of correspondence received from the school -Email threads
- Regional Center or developmental disabilities programs
- Documents of your choosing
Tip #1
After my children’s adoptions finalized and I received their new birth certificates, I went to a local courthouse and requested an extra official copy for each child. A lot of blood, sweat, and tears went into the lengthy adoption process. Their new birth certificates were priceless.
I would not risk others losing them. Each time I registered my children for sports and school or traveled, I provided the extra copy. This working copy is in a plastic protective sleeve at the beginning of their first binders.
Step Three – Separate Documents by Child
If you have more than one child receiving special education and or ongoing medical services, sort all of their records and documents by the child if everything is stored everything together.
Duplicate copies and drafts, especially of IEP’s, are saved and filed. The final version goes in the binder, and the rest go in the file box. My boxes are see-through. I placed a photo in the front, facing out of the child whose paperwork is in the box for identification.
My hanging file folder system is different than the binders. I keep all extra copies and drafts of each school year’s IEP’s and supplemental documents, such as evaluation reports, together in a folder labeled by each year.
I also keep copies of my child’s work product in this box. If you have schoolwork product that you consider important evidence, file that in the binder with corresponding documents. Before an IEP, I request copies of my child’s work product and the assessments the team used, to confirm that the goals progress reports are based on actual assessments and schoolwork and not opinions. I learned through unfortunate experience to verify everything.
Tip #2
Please do not take the time to read the documents as you sort them. Per Pete Wright – reading the files once everything is sorted and filed is much more useful. You will be amazed at how the big picture comes into focus when all documents from a particular time-frame are together.
Step Four – First Sort – By Year
Mac was about fifteen at the time; therefore, I had fifteen piles when I completed the first sort. He was denied special education services until sixth grade. The first twelve piles were small, but the subsequent years made up for it with huge volumes of documents. By the time he graduated from high school, I had filled up three, three-inch binders!
Step five – Second Sort – Date Order
Begin at the beginning. Lightly write the document date in pencil in the lower right corner on the first page of each document. I file IEP’s with by date that I signed, not the one on page one. You can choose whatever works best for you, but be sure to be consistent.
Once every document has a date written in the lower right corner, collate them in date order. Three-hole punch all of the sorted paperwork and place them in the binder. If you don’t want to hole-punch an original document, put it in a clear sleeve and file it in date order.
The dates are written in pencil in case you need to make copies. You can erase the markings. Continue dating and placing all of the documents in order into the notebooks. The first year or oldest materials are in the front. If the binder becomes full, start a new book at a good stopping and starting place. Label each binder. Mine are labeled 1-3 with a sharpie. It is not fancy, but it does the trick.
About the File Box
Create hanging files as you date and file in the binder. Place the duplicates and drafts in this box. Miss Bee participated in Special Olympics. I created a folder for all things related to her participation. This paperwork did not need to go in the binder, but I wanted to keep it. You can save whatever you’d like in this box.

Tip #3
Never, ever sign an IEP during the meeting, no matter how much pressure is exerted by the team to do so. It is especially crucial not to if the team did not provide you a copy five days before the meeting. You need to go home and thoroughly digest the document. It is impossible to separate your emotions from your child even if you give the team your best poker face.
It is also impossible to digest the IEP if your first read is during the meeting. Pay attention to what is being said and take notes during the meeting. When you are at home, you will have the opportunity to make sure all of your questions were answered and documented in the IEP. You can take your time to understand the present levels, assessment results, and the new goals make sense. Make sure the placement offered, is documented as agreed upon during the meeting. If you don’t ensure that everything is accurate and what the team discussed is in the notes, the team will deny what they said.
Step Six – How to Organize Emails
Create a file for each child in your email program. Every email regarding your child – sent and received needs to be saved there. It is a good idea to save them to the cloud or an external drive.
I save every email, and I print the critical threads to place in date order in the notebooks. It is incredibly helpful to read what the District or medical professionals said with the corresponding documents from that time.
Emails are powerful. They document what you and the District said or offered at the time.
For example:
In preparation for my daughter’s triennial assessment in seventh grade, I ask the school psychologist to create a table with the fourth-grade assessment results and the new assessment results side-by-side. Unless you compare results, it is difficult to determine progression or regression. The team was not happy with my request. Their attitudes informed me that I was on to something.
The coordinator tried to remind me that I had refused several assessments back in fourth grade. She was incorrect. I recalled an email from the teacher that would clarify the facts. I honed in on emails from fourth-grade, and I found what I needed.
Miss Bee’s teacher had contacted me by email informing me that her third-grade teacher conducted several assessments checked on the triennial assessment plan, at the end of third grade. The fourth-grade teacher suggested that we incorporate those results instead of re-testing since Miss Bee struggled with testing. I agreed.
The email thread was forwarded and the blow-back immediately stopped. I suggested that they locate those third-grade results and include them on the table. The results proved my hunch and as a result, Miss Bee received an additional, highly effective service.

Step Seven- Begin Reading at the Beginning
Now is the time to read your child’s history in order. Have a pad nearby. As you read, you might realize that paperwork is missing. Request copies in writing from your school district or your medical provider. The right to obtain copies of your child’s school records is part of the Procedural Safeguards.
Miscellaneous Tips
Do not write on or highlight original documents except the penciled date.
Try to keep your binder current.
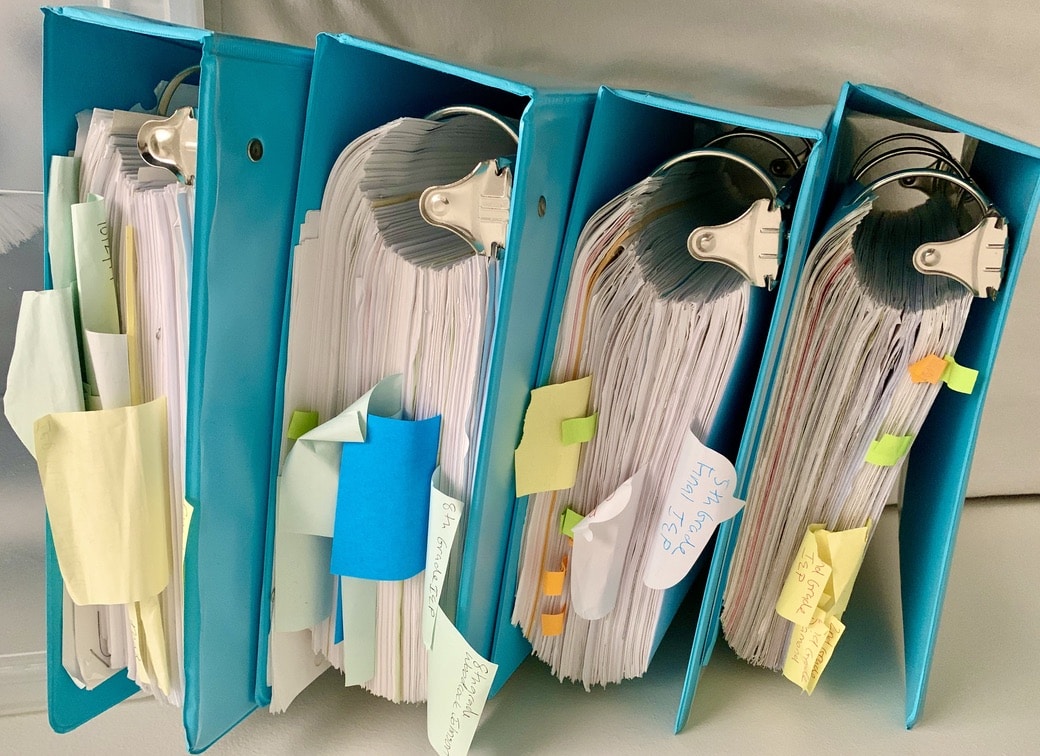
You can use dividers in your binders to divide years or however you want. I have flagged the critical documents with post-it notes on the top of the first page. It isn’t pretty, but it works for me. You might want to flag the IEP’s.
If you are a super organizer, create a table of contents for the beginning of each binder.

I Can Help You
Parents who are short on time and live near St. Johns County, Florida, gather your documents and bring them to me. For a reasonable hourly rate and the cost for supplies, I will organize your paperwork and create binders for you.
If you live elsewhere in Florida or in another state, please call or email for a consultation. There are numerous ways I can help.
(310)384-0622
invisibleinplainsight8@gmail.com
Your Special Education Paperwork is Organized
Congratulations, you have learned how to organize your special education and medical paperwork. Keeping up is an ongoing project. You will be well informed about your child’s challenges, achievements, and needs during future IEP meetings. Their history is at your fingertips.
Other Posts that May Interest you
What Special Education Parents Need to Know


Hi Rosemary!
Love your blog – sorry it took me so long to read it!!
I just subscribed at my work email: kw@swiesnerlaw.com and am going to “unsubscribe” at my karen@intelectric.net email BECAUSE the time has come to make that final separation and I will no longer have that email address. Wow, its been 30 years I’ve had it…moving on’
Please kiss the kids from me and give yourself a BIG hug xoxo
Hey Karen,
I am glad you like the blog. I hope you enjoy future posts. That is a big step. Say hi to your guys for me.